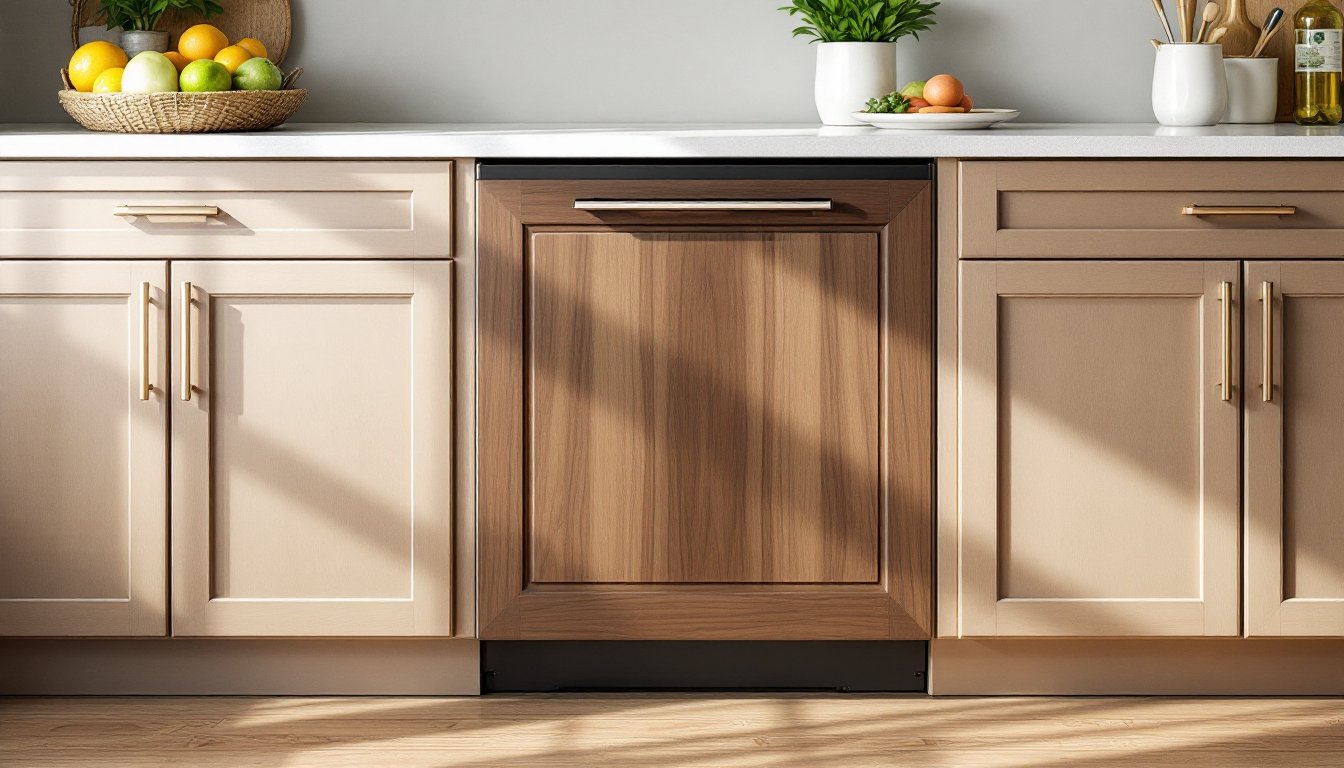
A dishwasher is essential, but a mismatched front panel can throw off an entire kitchen design. Whether you’re wrapping up a remodel or just tired of looking at that white metal door sticking out from your custom cabinetry, a dishwasher cabinet panel offers a straightforward fix. It’s not a complicated project, most homeowners with basic tools can handle it in an afternoon, but getting the measurements right and choosing the correct panel type makes the difference between a seamless finish and a sloppy fit. This guide walks through everything from panel selection to installation so the dishwasher blends into the cabinets instead of standing out.
Table of Contents
ToggleKey Takeaways
- A dishwasher cabinet panel matches your cabinetry and creates a seamless kitchen design by covering the appliance’s front door instead of leaving a visual break in your cabinet line.
- Choose between custom panels (2–6 weeks, $150–$500+), semi-custom panels (standard sizes, $75–$250), or stock panels (under $50) based on your budget, timeline, and how closely you need to match existing cabinets.
- Accurate measurements are critical—check your dishwasher manual for recommended panel dimensions and always measure the door opening height, width, and thickness (typically 1/2″ to 3/4″) to avoid gaps or fit issues.
- Most homeowners can install a dishwasher cabinet panel in an afternoon using a drill, measuring tape, and the manufacturer’s mounting brackets or clips without hiring a professional.
- Avoid common mistakes like using the wrong panel thickness, exceeding weight limits (typically 10–12 pounds), and overtightening screws into the thin door skin, which can strip threads or damage the appliance.
- Always test-fit the panel before final installation and ensure the dishwasher is level to guarantee the panel aligns properly with adjacent cabinet faces and doesn’t bind on the countertop or floor.
What Is a Dishwasher Cabinet Panel and Why Does It Matter?
A dishwasher cabinet panel is a decorative front piece that attaches to the appliance’s door, matching the surrounding cabinetry. Most built-in dishwashers come with a plain front designed to accept a custom panel. The panel itself is usually made of the same material as the kitchen cabinets, wood, laminate, or thermofoil, and is secured with mounting brackets or clips built into the dishwasher door.
Without a matching panel, the dishwasher becomes a visual break in the cabinet run, especially in kitchens with dark or distinctive finishes. It’s a small detail that has outsized impact on how finished and intentional a kitchen looks. Beyond aesthetics, a properly installed panel also protects the appliance door from dings and adds a layer of insulation that can slightly reduce noise.
Some homeowners confuse cabinet panels with overlay panels or end panels. An overlay panel covers the entire door surface and is typical in fully integrated European-style kitchens. An end panel, by contrast, covers the exposed side of a cabinet or appliance. A dishwasher cabinet panel specifically refers to the front-facing piece attached to the door.
Types of Dishwasher Cabinet Panels for Every Kitchen Style
Dishwasher panels generally fall into three categories: custom, semi-custom, and stock. Choosing the right type depends on budget, timeline, and how closely the panel needs to match existing cabinetry.
Custom vs. Semi-Custom vs. Stock Panels
Custom panels are fabricated to exact specifications by a cabinet maker or millwork shop. They match the wood species, stain, finish, and door style of the existing cabinets. This is the best option for high-end kitchens or unique cabinet styles (think quarter-sawn oak with a specific glaze or shaker doors with custom profiles). Expect a lead time of 2–6 weeks and costs ranging from $150 to $500+ depending on material and complexity.
Semi-custom panels are pre-made by cabinet manufacturers in standard sizes but offer options for finish, color, and door style. Companies like KraftMaid, Merillat, and Diamond Cabinets produce panels that coordinate with their cabinet lines. These are a good middle ground, better than stock but more affordable and faster than full custom. Prices typically run $75–$250. The downside is limited size flexibility: you may need to trim or shim to fit.
Stock panels are off-the-shelf options from big-box retailers like Home Depot or Lowe’s, often sold in unfinished wood or basic finishes (white, almond, stainless steel look). They’re the cheapest and fastest option, usually under $50, but expect a generic appearance. These work for rentals, budget flips, or temporary fixes. Unfinished panels can be stained or painted to approximate a cabinet finish, though matching existing cabinetry perfectly is tough without a sample and some trial and error.
How to Measure and Choose the Right Panel Size
Getting the panel dimensions right is the most critical step. An oversized panel will prevent the door from closing: undersized leaves gaps.
Start by checking the dishwasher’s installation manual for the recommended panel dimensions. Most manufacturers specify a range (e.g., 23.5″ W × 34.5″ H). Standard dishwashers are 24 inches wide, but the panel width is usually about 23.5″–23.75″ to clear the cabinet openings and door swing.
Measure the dishwasher door opening height from the top edge of the mounting bracket to the bottom of the door. Don’t guess or assume standard dimensions, dishwashers vary by model. Also measure the reveal at the top and sides: how much of the appliance frame is visible when the door is closed. The panel should cover this reveal without overlapping onto adjacent cabinet faces.
For thickness, most dishwasher doors accept panels ranging from 1/8″ to 3/4″. Cabinet door fronts are typically 3/4″ thick, but solid wood or MDF panels work best. Avoid anything thicker than 3/4″ unless the manufacturer explicitly allows it: excess weight can strain the door hinges and springs.
If trimming is needed, use a table saw or circular saw with a fine-tooth blade to avoid splintering. Cut from the back side of the panel and tape the cut line with painter’s tape for a cleaner edge. Test-fit before attaching hardware.
Step-by-Step Installation Guide for DIY Success
Installing a dishwasher panel is straightforward if you follow the sequence. Most dishwashers use metal clips or a bracket system hidden on the inner door. You’ll need a drill/driver, measuring tape, level, pencil, and the screws or clips that came with the appliance. Some models require a trim kit sold separately.
-
Remove the existing panel or filler strip if one is installed. Open the dishwasher door and locate the mounting brackets on the inner side. These are typically along the top and sides.
-
Position the panel face-down on a clean, padded surface (a towel or drop cloth works). Align the mounting brackets from the dishwasher door onto the back of the panel, centering it according to the manufacturer’s template. Some dishwashers include a paper template: tape it to the panel back to mark hole locations.
-
Pre-drill pilot holes if attaching with screws. For clip systems, snap the clips into the bracket slots, then press the panel firmly until it clicks into place.
-
Secure the panel with the provided screws, working from the center outward to avoid warping. Don’t overtighten, you’re fastening into a thin door skin, and stripping the holes is easy.
-
Check alignment by closing the door. The panel should sit flush with adjacent cabinet faces and not bind on the countertop or floor. If it rubs, loosen the screws slightly and adjust.
-
Install the handle or trim last. Many integrated dishwashers have a top control panel and no visible handle. If a handle is needed, measure and mark its position carefully so it aligns with nearby cabinet hardware. Use a template and drill from the front to avoid blowout.
For detailed installation techniques and troubleshooting tips, manufacturers’ instructions are indispensable, but the general process is consistent across brands.
Common Mistakes to Avoid When Installing Dishwasher Panels
Even experienced DIYers trip up on a few predictable issues. Here’s what to watch for.
Using the wrong panel thickness. Too thin, and the panel flexes or rattles. Too thick, and it adds weight that can damage the door springs or prevent the latch from engaging. Stick to the manufacturer’s specs, usually 1/2″ to 3/4″.
Ignoring the weight limit. Dishwasher doors are engineered for a specific load. A heavy hardwood panel or double-layer construction can exceed that limit, causing the door to sag or fail to stay open. Most doors handle up to 10–12 pounds: weigh the panel before installing.
Failing to account for trim and hardware. If the cabinet doors have applied molding or decorative edges, the dishwasher panel needs the same treatment. A flat panel next to detailed doors looks unfinished. Many cabinet suppliers sell matching trim kits. Alternatively, a skilled woodworker can rout profiles or apply edge banding.
Skipping the test-fit. Always dry-fit the panel before drilling or attaching hardware. Check clearance at the countertop, floor, and adjacent cabinets. A door that binds will wear prematurely and may damage the panel finish.
Overtightening screws. Dishwasher door skins are often thin sheet metal or plastic. Crank down too hard, and you’ll strip the threads or crack the mounting boss. Snug is sufficient, if the panel doesn’t rattle, it’s tight enough.
Not leveling the appliance first. If the dishwasher isn’t level, the panel won’t align with the cabinet faces no matter how carefully you install it. Adjust the leveling legs or shims before mounting the panel. Use a bubble level across the top edge of the appliance.
For those new to cabinet and trim carpentry projects, taking time on the prep and measurement steps prevents most of the headaches. When in doubt, a custom-built approach with templates ensures precise results.
Conclusion
A dishwasher cabinet panel is one of the simplest upgrades that delivers immediate visual impact. With the right measurements, a matching panel, and a methodical installation, any homeowner can achieve a built-in look without hiring a pro. Focus on accurate sizing, respect weight limits, and don’t skip the test-fit. The result is a kitchen that looks cohesive and finished, no conspicuous appliances breaking up the cabinet line.